ffmpeg合并视频文件 官方文档


Concatenating media files
合并视频文件
If you have media files with exactly the same codec and codec parameters you can concatenate them as described in "Concatenation of files with same codecs". If you have media with different codecs you can concatenate them as described in "Concatenation of files with different codecs" below.
如果你有相同编码的视频文件想要合并,那么请直接阅读“合并相同编码文件”。如果你有不同编码的视频文件需要进行合并,那么请阅读“合并不同编码的文件”。
Concatenation of files with same codecs
合并相同编码的文件
There are two methods within ffmpeg that can be used to concatenate files of the same type:
the concat ''demuxer''
the concat ''protocol''
The demuxer is more flexible – it requires the same codecs, but different container formats can be used; and it can be used with any container formats, while the protocol only works with a select few containers.
这里有两种方法使用ffmpeg合并相同类型的文件:
使用视音频分离器进行合并
使用协议命令行进行合并
ffmpeg的视音频分离器拥有更强的灵活性--它需要相同的编码格式,但是却适用于不同的内容格式;它适用于所有的内容格式,但是协议命令行只能对很少的内容格式生效。
Concat demuxer
使用视音频分离器进行合并
You can read about the concat demuxer in the documentation. This demuxer reads a list of files and other directives from a text file and demuxes them one after the other, as if all their packets had been muxed together. All files must have the same streams (same codecs, same time base, etc.) but can be wrapped in different container formats.
你可以阅读文档中关于视音频分离器合并的介绍。视音频分离器读取文本文件中的文件列表并且分配它们按照顺序排列,就好像所有数据都混合在了一起。所有文件必须是相同的数据流(一样的编码,一样的时间基准等等)但是能包含在不同的内容格式中。
Instructions
说明
Create a file mylist.txt with all the files you want to have concatenated in the following form (lines starting with a # are ignored):
创建一个文件,名为“mylist.txt”,里边包含了所有你想要合并的文件名称,格式如下:(列表开始于一个#标志,第一行是解释,ffmpeg会无视它)
# this is a comment
file '/path/to/file1'
file '/path/to/file2'
file '/path/to/file3'
Note that these can be either relative or absolute paths. Then you can stream copy or re-encode your files:
注意在文件中可以包含相对路径或者绝对路径。然后你能使用复制流或者重新编码你的文件。
ffmpeg -f concat -safe 0 -i mylist.txt -c copy output
The -safe 0 above is not required if the paths are relative.
如果路径是相对路径,-safe 0不是必须的。
Automatically generating the input file
自动生成输入文件
It is possible to generate this list file with a bash for loop, or using printf. Either of the following would generate a list file containing every *.wav in the working directory:
下面是一种可能的方法使用bash利用for循环生成列表文件,当然你也可以使用printf命令。下面的命令会生成一个列表文件包含了工作文件夹中所有.wav结尾的视频文件。
# with a bash for loop
for f in ./*.wav; do echo "file '$f'" >> mylist.txt; done
# or with printf
printf "file '%s'\n" ./*.wav > mylist.txt
On Windows Command-line:
在windows系统的命令行:
(for %i in (*.wav) do @echo file '%i') > mylist.txt
Or for Windows bat-file:
在windows编写bat文件
(for %%i in (*.wav) do @echo file '%%i') > mylist.txt
If your shell supports process substitution (like Bash and Zsh), you can avoid explicitly creating a list file and do the whole thing in a single line. This would be impossible with the concat protocol (see below). Make sure to generate absolute paths here, since ffmpeg will resolve paths relative to the list file your shell may create in a directory such as "/proc/self/fd/".
如果你的shell支持进程的替换(像Bash和Zsh),你不能拒绝创建一个列表文件并且完成所有合并工作只需要一条简单的命令。这对于协议命令行合并视频是不能实现的(详细请参考下面的内容)。确保在这里使用绝对路径进行生成,然后ffmpeg会自动解析相当列表文件的路径,你的shell命令应该创建的路径地址类似"/proc/shlf/fd/"。
ffmpeg -f concat -safe 0 -i <(for f in ./*.wav; do echo "file '$PWD/$f'"; done) -c copy output.wav
ffmpeg -f concat -safe 0 -i <(printf "file '$PWD/%s'\n" ./*.wav) -c copy output.wav
ffmpeg -f concat -safe 0 -i <(find . -name '*.wav' -printf "file '$PWD/%p'\n") -c copy output.wav
You can also loop a video. This example will loop input.mkv 10 times:
你也能循环一个视频文件。这个例子会循环input.mkv文件十次:
for i in {1..10}; do printf "file '%s'\n" input.mkv >> mylist.txt; done
ffmpeg -f concat -i mylist.txt -c copy output.mkv
Automatically appending to the list file
自动添加进列表文件
Concatenation does not work if the next clip for does not exist at the moment, because decoding won't start until the whole list is read. However, it is possible to refer to another list at the end of the current list. The following script provides an example for this mechanism:
如果下一个剪辑不存在,则合并不会生效,因为解码会在读取了整个列表文件之后才会开始。然后,它可能会在当前列表末尾引用另一个列表。 以下脚本为此机制提供了一个示例:
#!/bin/bash

fn_concat_init() {
    echo "fn_concat_init"
    concat_pls=`mktemp -u -p . concat.XXXXXXXXXX.txt`
    concat_pls="${concat_pls#./}"
    echo "concat_pls=${concat_pls:?}"
    mkfifo "${concat_pls:?}"
    echo
}

fn_concat_feed() {
    echo "fn_concat_feed ${1:?}"
    {
        >&2 echo "removing ${concat_pls:?}"
        rm "${concat_pls:?}"
        concat_pls=
        >&2 fn_concat_init
        echo 'ffconcat version 1.0'
        echo "file '${1:?}'"
        echo "file '${concat_pls:?}'"
    } >"${concat_pls:?}"
    echo
}

fn_concat_end() {
    echo "fn_concat_end"
    {
        >&2 echo "removing ${concat_pls:?}"
        rm "${concat_pls:?}"
        # not writing header.
    } >"${concat_pls:?}"
    echo
}

fn_concat_init

echo "launching ffmpeg ... all.mkv"
timeout 60s ffmpeg -y -re -loglevel warning -i "${concat_pls:?}" -pix_fmt yuv422p all.mkv &

ffplaypid=$!

echo "generating some test data..."
i=0; for c in red yellow green blue; do
    ffmpeg -loglevel warning -y -f lavfi -i testsrc=s=720x576:r=12:d=4 -pix_fmt yuv422p -vf "drawbox=w=50:h=w:t=w:c=${c:?}" test$i.mkv
    fn_concat_feed test$i.mkv
    ((i++));
    echo
done
echo "done"

fn_concat_end

wait "${ffplaypid:?}"

echo "done encoding all.mkv"
Concat protocol
使用协议命令进行合并
While the demuxer works at the stream level, the concat protocol works at the file level. Certain files (MPEG-2 transport streams, possibly others) can be concatenated. This is analogous to using cat on UNIX-like systems or copy on Windows.
音视频分离器运作于流层面,而协议命令行运作于文件层面。确定的文件(mpeg-2转换流,或者其他类型)能够被合成。这很相似在unix系统中利用cat命令或者是在windows系统中利用复制命令。
Instructions
介绍
The following command concatenates three MPEG-2 TS files and concatenates them without re-encoding:
下面这个命令行合并三个mpeg-2编码类型ts文件并且没有重新编码
ffmpeg -i "concat:input1.ts|input2.ts|input3.ts" -c copy output.ts
Using intermediate files
使用生成的中间文件进行合成
If you have MP4 files, these could be losslessly concatenated by first transcoding them to MPEG-2 transport streams. With H.264 video and AAC audio, the following can be used:
如果你有mp4文件,这里有方法无损的合成,先将其然换成mpeg-2流的ts格式。拥有h.264视频编码和aac音频编码格式的文件能够使用下面的方法:
ffmpeg -i input1.mp4 -c copy -bsf:v h264_mp4toannexb -f mpegts intermediate1.ts
ffmpeg -i input2.mp4 -c copy -bsf:v h264_mp4toannexb -f mpegts intermediate2.ts
ffmpeg -i "concat:intermediate1.ts|intermediate2.ts" -c copy -bsf:a aac_adtstoasc output.mp4
Using named pipes to avoid intermediate files
使用命名的pipe管道不使用中间文件进行合成
If you're using a system that supports named pipes, you can use those to avoid creating intermediate files. This sends stderr (to which ffmpeg sends all the written data) to /dev/null, to avoid cluttering up the command-line:
如果你使用的系统支持命名的pipes管道,你能够用这个东西不用生成中间文件就可以进行合成。这传输stderr(ffmpeg传输所有的写入数据)进/dev/null,以避免混淆命令行:
mkfifo temp1 temp2
ffmpeg -y -i input1.mp4 -c copy -bsf:v h264_mp4toannexb -f mpegts temp1 2> /dev/null & \
ffmpeg -y -i input2.mp4 -c copy -bsf:v h264_mp4toannexb -f mpegts temp2 2> /dev/null & \
ffmpeg -f mpegts -i "concat:temp1|temp2" -c copy -bsf:a aac_adtstoasc output.mp4
The additional -y switch is needed to force ffmpeg to write to existing files temp1 and temp2, which are the named pipes. Without the switch, the first two ffmpeg programs running in the background will not produce any output because they wait for interactive yes/no answers to the questions whether to overwrite existing files.
格外的-y参数强制ffmpeg写入数据到存在的文件temp1和temp2中,这两个文件是命名的pipes管道文件,如果没有这个参数,那么开始的两个后台运行的ffmpeg程序将不会产生任何输入,因为它在一直对于是否覆盖已经存在的文件的选项,等待yes/no的输入回答。
All MPEG codecs (MPEG-4 Part 10 / AVC, MPEG-4 Part 2, MPEG-2 Video, MPEG-1 Audio Layer II, MPEG-2 Audio Layer III (MP3), MPEG-4 Part III (AAC)) are supported in the MPEG-TS container format, although the commands above would require some alteration (e.g., the -bsf bitstream filters will have to be changed).
所有mpeg编码(MPEG-4 Part 10 / AVC, MPEG-4 Part 2, MPEG-2 Video, MPEG-1 Audio Layer II, MPEG-2 Audio Layer III (MP3), MPEG-4 Part III (AAC))都被支持在mpeg-ts容器格式中,尽管以上命令行需要一些额外的变动(例如,-bsf 比特流筛选器必须变动下)。
Concatenation of files with different codecs
合成不同编码的文件
In many cases, input files will have different codecs or different codec properties, which makes it impossible to use any of the above methods.
在很多例子中,输入的文件拥有不同编码格式或者不同的编码属性,这让它很难使用以上所述的方法进行合成。
Concat filter
利用滤镜进行合成
See the concat filter documentation for more info. The filter works on segments of synchronized video and audio streams. All segments must have the same number of streams of each type, and that will also be the number of streams at output.
阅读文档中过多关于过滤器也就是滤镜进行合成的内容。该滤镜适用于同步的视频和音频流的片段。所有类型的片段必须具有相同数量的流,这也将是输出流的数量。
Note: Filters are incompatible with stream copying; you can't use -c copy with this method. Since you have to re-encode the video and audio stream(s), and since re-encoding may introduce compression artifacts, make sure to add proper target bitrate or quality settings. See the encoding guides? for more info.
注意:滤镜无法使用复制流;这意味着你不能使用-c copy参数。你必须重新编码视频和音频流,然后重新编码会引入压缩的新工件,请确保添加了正确的目标码率或者质量设置。请阅读编码的指导?获取更多信息。
For the concat filter to work, the inputs have to be of the same frame dimensions (e.g., 1920⨉1080 pixels) and should have the same framerate. Therefore, you may at least have to add a scale or scale2ref filter before concatenating videos. A handful of other attributes have to match as well, like the stream aspect ratio. Refer to the documentation of the filter for more info.
要让滤镜合并文件工作,那么输入的文件必须拥有相同的分辨率(比如,都是1920x1080分辨率)和最好拥有相同的码率。因此,你在合成视频之前至少必须添加一个scale或者scale2ref滤镜。一些其他的属性也必须匹配好,像是视频流的长宽比都必须一致。请参考文档关于滤镜的更多信息。
Instructions
介绍
Let's say we have three files that we want to concatenate – each of them with one video and audio stream. The concat filter command would look like this:
下面我们有三个视频文件想要进行合并,每一个文件都拥有一个视频流和音频流。滤镜合成命令应该如下:
ffmpeg -i input1.mp4 -i input2.webm -i input3.mov \
-filter_complex "[0:v:0][0:a:0][1:v:0][1:a:0][2:v:0][2:a:0]concat=n=3:v=1:a=1[outv][outa]" \
-map "[outv]" -map "[outa]" output.mkv
Now, let's dissect that command. We first specify all the input files, then instantiate a -filter_complex filtergraph – this is needed instead of -filter:v because it has multiple inputs and outputs.
现在,让我们剖析这个命令行。我们首先指定了所有的输入文件,然后实例化了一个-filter_complex滤镜参数,这个是替代-filter:v的必须的参数,因为这里有多个输入和输出文件。
The following line:
下面这一行:
[0:v:0][0:a:0][1:v:0][1:a:0][2:v:0][2:a:0]
tells ffmpeg which streams to take from the input files and send as input to the concat filter. In this case, video stream 0 [0:v:0] and audio stream 0 [0:a:0] from input 0 (input1.mp4 in this example), and video stream 0 [1:v:0] and audio stream 0 [1:v:0] from input 1 (input2.webm), etc.
告诉ffmpeg从输入的文件中采用哪一个流并且传输到滤镜中进行合成。在这个例子中,从索引为0的输入文件(input1.mp4在这个例子中)采用视频流0[0:v:0]和音频流0[0:a:0],从索引为1的输入文件(input2.webm)中采用视频流0[1:v:0] 和音频流0 [1:v:0],其他命令行类似。
concat=n=3:v=1:a=1[outv][outa]'
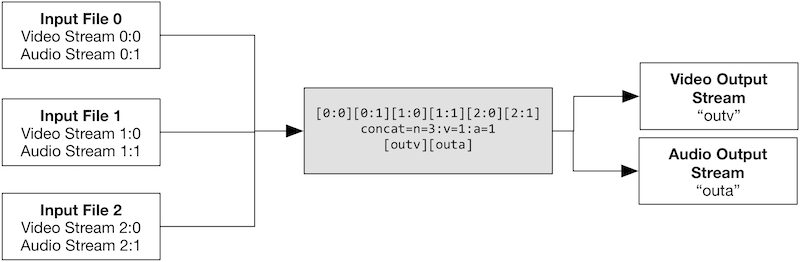
This is the concat filter itself. n=3 is telling the filter that there are three input segments; v=1 is telling it that there will be one video stream per segment; a=1 is telling it that there will be one audio stream per segment. The filter then concatenates these segments and produces two output streams. [outv] and [outa] are names for these output streams. Note that the quotes around the filter section are required.
这是滤镜合成本身。n=3是告诉滤镜那里有三个输入的片段;v=1是告诉滤镜那里每个片段有一个音频流。滤镜然后合并那些片段并且产生两个输出流。[outv] 和 [outa]是命名的那两个输出流。注意双引号包裹的段落是必须的,也就是不能省略双引号。
The following image shows the stream mapping to and from the filter in the above example:
下面这个图片将会展示以上案列中这些流在滤镜中输入和输出的拓扑图:
You can then either re-use these streams in other filters, or map them to the output file:
你能可以在其他的过滤器中重新利用这些流,或者重新拼凑它们到新的输出文件:
-map "[outv]" -map "[outa]" output.mkv
This tells ffmpeg to use the results of the concat filter rather than the streams directly from the input files.
这告诉ffmpeg利用滤镜合成之后的文件,而不是直接从输入文件中合成。
Using an external script
利用一个外部的脚本
There is a Bash script called mmcat which was useful for older versions of ffmpeg that did not include the concat filter.
这是一个bash脚本名字叫mmcat,它是利用了一个老版本的ffmpeg,这个版本的ffmpeg没有包含滤镜合成。